
Spark Blueprint™ is an easy to use tool for room planning and high quality visualisation. This guide will help you get started.
Spark Blueprint User Guide
Interface overview
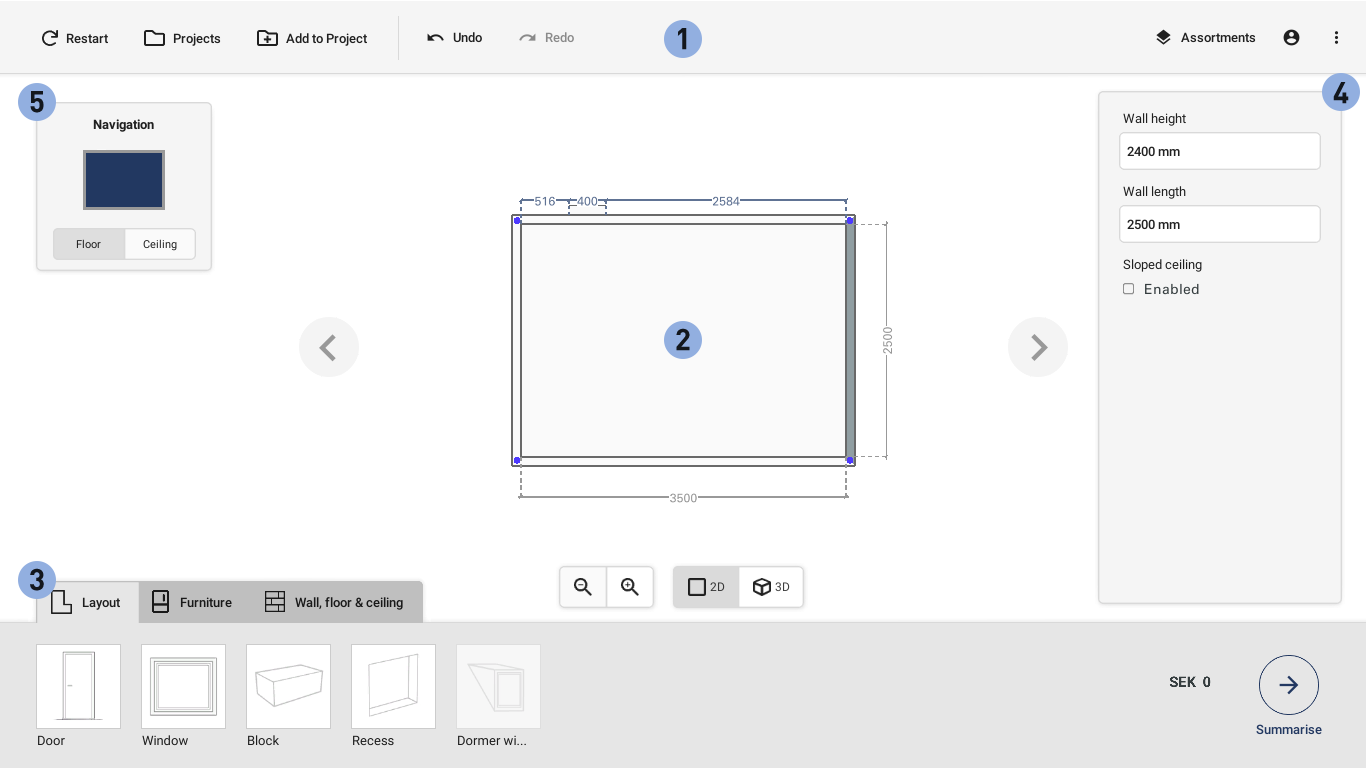
1. Control bar
The Control bar contains application wide actions such as saving and loading projects, redo and undo actions, the Assortment manager, user account control and settings.
2. Drawing area
The drawing area displays a view of the current drawing. The drawing can be viewed in either 2D layout view or a 3D perspective view.
3. Palette
The palette contains objects and products that can be placed in the drawing.
4. Property panel
This panel displays the configurable properties of the object that is currently select in the drawing—for example placement, rotation or color. The properties available depends on the object.
5. Navigation panel
The navigation panel shows which wall or floor is currently viewed in the Drawing area. It also allows you to quickly select a surface by clicking it.
Getting started
Installing
To install Blueprint, run the setup file that you have received. If you have not received the setup file contact [email protected].
Logging in
When the installation is complete you will be asked to log in. Do this either by creating a new user account or by logging in with and existing one. All you need is an email address.
Registering
When you are logged in, you will be asked to register to get a license, if you do not already have one. Fill out your contact information in the form fields and press the “Submit” button. It is important that the information you fill in is correct.
Downloading assortments
To use Blueprint properly you will need some assortments. Downloading and installing assortments is done with the Assortment manager.
The Assortment manager lists all the assortments that are available. To download an assortment simply click “Add”. Do the same for all the assortments you want.
You will always be notified in the Control bar when there is a new version available of an assortment that you have installed. An installed assortment can be set to automatically install any new versions that come available.
Creating a drawing
Modifying the layout
Start off by getting the measurements of your drawing right. Make sure the “Layout” tab is selected in the Palette.

Select the floor perspective in the Navigation panel by clicking in the middle of the drawing representation.

Basic actions
The walls in the drawing needs to be modified so they match the layout and size of your drawing. There are several ways to modify the walls.
Click and drag
Click on and drag the walls to move them.

Text input
Select a wall and change the length in the Property panel. Click on the wall that should be modified and enter the desired in the Wall length input box.
Arrow keys
Fine-tune the placement of a corner by using the keyboard’s arrow keys. On press will nudge it 1 millimeter at the time. Hold down shift while pressing the arrow to nudge it 10 millimeters at the time.
Select a wall by clicking and then changing the value “Wall height” in the Property panel. 
Note that all walls in the room have the same height, so changing this value for one wall will change it for all walls.
Adding walls is done by adding corner points and moving them.
To add a corner point, double click on wall. (To remove a corner point, double-click on the corner point itself.)
So for example to create an L-shaped drawing, add two corners and move one corner to create the L-shape. Then move the walls to the desired measurements.

Click on the wall where you want the sloped ceiling. Then select the “Sloped Ceiling” option from the Property panel. Modify the measurements by changing the parameters Height from floor, Ceiling length or Angle.
In this example we add a door, but all objects are added in the same way.
- Click on the door icon in the lower left to insert a door.
- Click in the drawing where the door should be
 Then the door can then moved by clicking and dragging it.
Select the door type and specify the door’s dimensions in the Property panel.
Doors and windows
Doors and windows can only be placed in walls.
Blocks
Blocks can be used for many purposes such as walls or built-in bathtubs. Surface products such as tiles can be placed on a block.
Recess
The recess can be placed on walls and can be decorated with surface products such as tiles.
Dormer window
Dormer windows can only be placed in sloped ceilings. They can be decorated with surface products.
Adding furniture
To add furniture to your drawing select the Furniture tab in the Palette.

Basic actions
Click on the “+”-button to open the Select view.

In the Select view choose an assortment in the drop down.

Select one or more products and close the Select view again.

Place the products in the drawing by selecting them in the Palette and clicking in the drawing. This can be done both in the 2D and 3D perspective.

Note that it is also possible to drag and drop to products from the Palette into the drawing.
To remove a product from the drawing.
- Select the product and press “Delete” on your keyboard
- Drag the product outside the walls of the room
Adding products to surfaces
To add furniture to your drawing select the Wall, floor & ceiling tab in the Palette.

Basic actions
Click on the “+”-button to open the Select view.
In the Select view choose an assortment in the drop down.

Select one or more products and close the Select view again.

Select a product in the Palette
Click and drag along a surface in the drawing to put several tiles in place.

Select the Eraser tool.
Click and drag across the surface where the product should be removed.

Saving and loading
One or several proposals of a drawing can be saved so that you can access them later. To save your proposals temporarily, press the “Add to Project” button on the top menu. To save another proposal of the room, change it and press the “Add to Project” button again.
You can now access your saved proposals by pressing the “Projects” button. From here you can rename and delete the proposals by using the icons on top of each one. Make sure to press the “Save Project” button to save the file permanently to your computer.
The next time you start up Blueprint, you can load the project with all proposals through the “Load Project” button and select each one by name.
Cloud Render - Photorealistic visualisation
Cloud Render creates photorealistic images of the room with one easy click. Set the appropriate perspective in Summarize and then click in Cloud Render. Using Cloud Render requires a separate license. Contact [email protected] for more information.
Contact support
If you have any questions or experience problems, please feel free to contact us at [email protected] or on +46 31 708 98 00.